 Devin Doyle
 Installing a whole house water filter can transform the way water tastes and feels from every faucet in the house. Homeowners who enjoy tackling projects often like the idea of installing one themselves to save money and get their hands dirty. Here are some practical DIY choices for whole house filters that help figure out if this kind of project fits your skill set. Keep reading to discover the tips that make this job easier and why taking on this challenge can lead to cleaner, better water all day long.
We will cover common filter types that work for DIY, the tools and materials you need, a clear step by step outline of installation tasks, typical problems and how to avoid them, plus guidance on when to bring in professional help. Read on to get realistic expectations and useful tips so you can approach a whole house filter project with clarity.
What whole house filters do and why DIY is tempting
Whole house filters sit at the main water line and treat water before it reaches faucets, appliances, and showers. They remove particles, chlorine, sediment, and in some setups reduce specific contaminants. The appeal of a DIY route is lower labor cost and control over the schedule. Many available systems are designed with homeowner installation in mind which makes DIY realistic for people who are comfortable with basic plumbing tasks.
That said, whole house systems vary in complexity. Simple sediment filters are straightforward. Multi stage systems with backwash, UV, or chemical media need more planning. We will break down options so you can match a system to your skills and needs.
Types of whole house filters suitable for DIY installation
Not every whole house filter is a sensible DIY choice. Here are systems commonly handled by homeowners with standard plumbing skills.
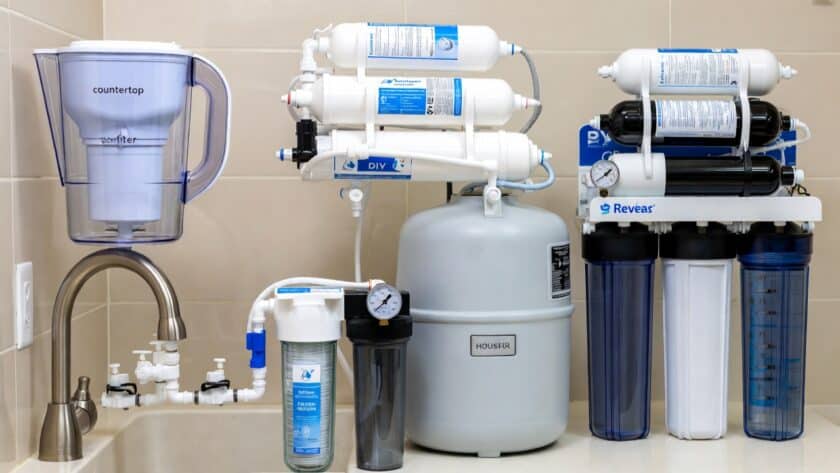
- Sediment cartridge filters These remove sand, rust, and particles. They often use a single housing and cartridge that is easy to mount and replace.
- Carbon cartridge filters Good for chlorine taste and odor plus some organic chemicals. They look similar to sediment housings and are usually easy to install.
- Multi cartridge assemblies Two or three housings in a row add stages while still remaining manageable for DIY plumbers if you plan the layout and support mounting properly.
- Catalytic carbon and specialized media These media types handle specific contaminants but the housing and plumbing are still simple in many products.
- Whole house softeners and backwash filters These are heavier and need drain and power hookups. Some homeowners install them but they require more planning and space.
Avoid systems labeled for commercial use or those needing complex electrical or control wiring unless you have specific experience. Matching the filter type to the water quality problem is the first step.
Tools and materials you will need for a DIY whole house filter
Having the right tools prevents slowdowns and errors. Gather the essentials before you start and measure twice before cutting any pipe.
- Pipe cutter or hacksaw suited to your pipe material
- Adjustable wrench set and pliers
- Teflon tape and pipe thread compound for threaded connections
- Compression fittings, union fittings, or soldering tools if you use copper
- Mounting brackets and appropriate anchors for your wall or floor
- Bucket, towels, and a shutoff valve to isolate the work area
- Replacement cartridges and O rings supplied with the filter kit
Preparatory steps before buying a system
Test your water or at least review the municipal water report to identify contaminants. Check main line pipe size and location, and confirm whether you need extra valves for backwash drains or a bypass. Choosing the correct pipe fittings at the outset saves return trips to the hardware store.
Step by step DIY installation guide for a basic whole house filter
The following steps describe a typical install for cartridge style whole house filters. Adapt details for multi stage or softer systems.
Preparation and safety steps
- Shut off the main water supply and relieve pressure by opening a faucet
- Turn off water heater when working on hot water lines to avoid damage
- Mark and measure the section of pipe where the filter will mount allowing clearance for cartridge changes
- Set up a temporary bucket under the cut to catch residual water
Installation tasks
- Cut the pipe and deburr the edges
- Dry fit the filter housing and fittings to confirm alignment
- Install shutoff valves or a bypass so you can service the filter without shutting off house water forever
- Apply Teflon tape to threaded fittings and tighten unions by hand then with a wrench
- Mount the bracket and attach the housing securely
- Insert cartridges and close housings following manufacturer torque guidance
- Slowly open the main shutoff to pressurize the system and check for leaks
- Flush the system as required by the cartridge instructions until water runs clear
Timing varies but many homeowners complete basic installs in a half day once the space is prepared. If soldering or gas fitting is required the time and skill level increase.
Common problems during DIY installation and how to avoid them
Anticipating common issues will make a DIY project smoother. The problems below are frequent and preventable.
- Leaking joints Use correct sealing compound and tighten fittings only to the recommended level. Over tightening damages threads and O rings.
- Incorrect pipe sizing Confirm pipe diameter and choose fittings that match the system flow ratings. Undersized fittings create pressure loss and performance loss.
- Poor mounting Whole house housings can be heavy when wet. Use strong brackets and anchor them to studs or concrete.
- Forgetting bypass Servicing a whole house filter without a bypass means shutting water off each time. Install a bypass for convenience and to avoid disruption during repairs.
- Neglecting drainage for backwash Systems that require a drain need a planned route that meets local codes. Test drain flow and secure a safe discharge location.
Replace O rings every few years and lubricate them with the manufacturer approved lubricant when servicing. Keep spare cartridges on hand to avoid gaps in protection.
When a DIY route is not the right choice
Some whole house systems are best left to a licensed plumber. Consider professional help in these situations.
- Complex systems that require electrical wiring or integration with a water heater
- Homes with galvanized steel mains or older plumbing materials that may fail when disturbed
- Projects that need permits or where local code sets strict rules for backwash and discharge
- When you locate a leak in a hidden area or suspect major corrosion
If you are unsure about code requirements or how to size a backwash drain, consult a professional. For local service and more reading on whether DIY installation is possible consider reviewing this resource for trusted local options and guidelines https://www.brightwaterplumbingorlando.com/
Cost comparison and realistic savings for DIY whole house filters
Material costs vary with filter type. A basic single cartridge whole house filter can cost a few hundred for parts. Multi stage assemblies often run higher. Labor charged by a plumber typically adds several hundred depending on local rates and complexity. When you factor in the time to research, buy parts, and install, DIY can save money but only if the work is done correctly and the system performs as expected.
Calculate savings by listing parts, fittings, and expected cartridge replacement costs over the first two years. If a project requires specialized tools that you will not use again, renting or buying those tools reduces the savings. Also include the value of your time and the possibility of needing a pro to fix mistakes when assessing whether to do it yourself.
Maintenance tips to keep a whole house filter working well
Regular maintenance extends filter life and maintains water flow. Simple steps keep systems healthy.
- Change cartridges on the schedule recommended by the manufacturer or sooner if flow slows
- Check and lubricate O rings at service intervals to prevent leaks
- Monitor water pressure and note sudden drops which point to clogged media
- Keep a log of service dates and any parts replaced so you can spot patterns
For backwash systems test the backwash function every few months to confirm proper operation. For any unusual taste or cloudiness, test water and change media if indicated.
Deciding to install a whole house water filter yourself is a practical choice for many owners with basic plumbing skills. Simple sediment and carbon cartridge systems are accessible for DIYers who plan, gather the correct tools, and follow the steps above. More complex systems may still be DIY friendly if you have wiring or drain planning experience. Always match the system to water testing results and local code requirements and include a bypass for easier service.
If you choose the DIY path remember that careful prep, correct fittings, and steady testing during the first days of operation will prevent the majority of common problems. When in doubt consult a licensed plumber to inspect connections or to handle tasks beyond your comfort level. A well installed whole house filter delivers better water throughout your home and reduces wear on appliances. Take the first step today by testing your water and selecting a system that fits your needs and skills.